0 Spring Crackdown

Wednesday, May 8, 2013
Spring Crackdown is my own personal way of ditching the wintertime blues, literally. Winter for me is a terrible, terrible thing, it makes me positively miserable. To cope, I become what we all like to call an "emotional eater" I eat anything I think will make me feel better and generally that means cookies, lots and lots of cookies, and other sugary baked things. The Spring Crackdown starts at the end of spring break or whenever the sun decides to show its glorious shining face. The phases follow no set schedule seeing as how this is MY system and all my readers know how I feel about measurements and such.. So the phases follow my whims and if you feel like jumping on the bandwagon I give you my solemn promise (scout's honor):
This is not a fad diet, 
this is not a crash diet, 
this will not kill you, 
this is perfectly sound, 
this is not insane, 
this will not turn you into a hungry eating machine, 
this will not turn you into an angry starvation crazed monster, 
you will feel better

What I need you to keep in mind:
you will not see "immediate" results
it takes time for your body to respond
it will be worth it! (these are photos I found on google images, I don't have any rights to them)


It begins with Phase One:
Spring crack down, jump on the bandwagon: if it grows in the ground you can eat it, if it eats things that grow in the ground you can eat it. If it does not fall under either category, don't eat it, it is not food, it is trash.
Learn the difference between food and trash
This is food.
This is trash. 
Easy enough so far right? Awareness is key in this phase, so pay attention to what you're putting into your body. Food is not an emotional crutch, though many of us, myself included, are guilty of using it as such. We all have our go-to items, think about your problem areas. For me it's sugar (in case you couldn't tell) 

Phase Two:
Spring Crackdown: Eat meals. A meal consists of one protein and two vegetables, OR one protein, one vegetable, and one fruit. A meal is NOT two proteins, or two fruits. Meals have three items, one MUST be a vegetable and one MUST be protein(not necessarily meat).
This is a meal.

Phase Three:

Spring crackdown: new rule, time to step it up, if it has a label and it has more than 13g sugar, just say NO! It is trash, do not eat it.
Sugar is my own personal demon, if yours is carbs, set a carb limit, if it is sodium, set a sodium limit. Learn how to read food labels. If it doesn't have a label because it is fresh produce, EAT IT! It is FOOD! 

Phase Four
Is it food? or is it simply something that is edible?
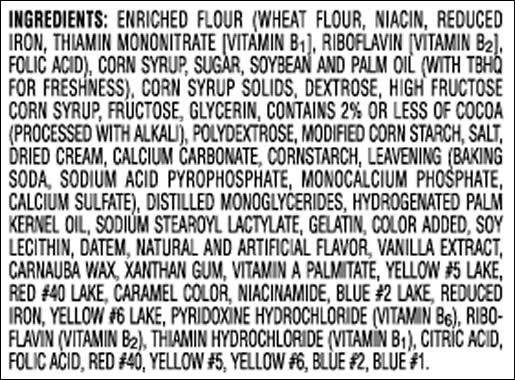
For the love of all that is holy, read the ingredients. Can you pronounce them? Can your 6 year old niece pronounce them? Does it contain a bunch of preservatives? Your body does not need preservatives. Your body does not need "artificial flavors" or "yellow #5" so why are you putting that into it? 

Phase Five:

Spring crack down: game changer, raw vegetables are free in terms of your caloric bank account, everything else must be bought and paid for: eat 100 calories = burn 100 calories.
Time to step it up another notch. start getting real with your food. Your body needs food to burn as fuel like your car needs gas.. you don't keep putting gas in the car once its full, so why do the same to your body? 
To figure out what your body needs try looking HERE(this one is a bit high), HERE(I like this one better), or HERE(probably the most accurate). You are welcome to compare and see which one you agree with more based on your activity level and such. 

Another way to handle this situation is to stop eating once you are satiated. Not FULL, we as Americans with our over abundance of readily available food tend to over eat. You do not need to eat until your plate is clear, or until your belly is completely full. If you're having a hard time distinguishing when that feeling happens, eat slower. You can fake your body out by eating too fast and it wont realize it is overly full until you stop and take a breath, that's when you get that "Oh my God, I'm going to throw up if I even look at food right now" feeling. 


So lets recap here for a minute..
1. Stop eating trash.
2. Eat complete meals.
3. Watch your sugars (insert your own personal demons here).
4. Cut out the non-necessities.
5. Don't over-do food. Portion control. 
Simple enough? I think so. Now put the store-bought cookie down and go have some carrots, an apple and peanut butter. 

0 Potato Candy

Monday, April 29, 2013
Tomorrow we are losing one of our dearest co-workers. She is getting a promotion and being re-located. She has been the oil that has kept our well oiled machine running though others have compared her to the glue that holds  us together. I don't even know what her formal job title is... but I know that no matter what is going on, what questions I have, who/what I am looking for, she knows all the details without looking them up and always points me, or whoever is inquiring, in the right direction. She is the person who knows everything about everything. I'm not really sure what we are going to do without her, but I know that I will not be full-time after May so that is my consolation. I work at an elementary school with over 730 kids. She knows all of them, their names, their siblings, who their parents are and what class you can find them in.

 As sort of a going-away thing, we are having a pot-luck lunch tomorrow.
 I am part of the department that always gets told "bring whatever you want". Most departments get assigned dishes, i.e. 3rd grade teachers bring veggies, 5th grade brings desert, etc.. I would much rather them tell me "hey Sam, bring an apple pie" or "hey Sam, bring mashed potatoes" but of course, they can't even narrow it down a little bit for me. I really shouldn't complain, it leaves my horizons wide open... this however gets a little overwhelming and I realize I am over-thinking our little pot-luck.. But, I decided to make potato candy. I have heard tell of it but never a description of flavor or even appearance, I simply knew that there was something called potato candy, my grandma has made it before, and it was supposedly really good. Without a description of any kind I decided that it was in fact what I was going to make, a quick internet search to compare ingredients of several variations eliminated the need to make a grocery run (thank goodness). So off I went to my kitchen after throwing a couple potatoes in the oven and pulling out the rest of the required items, I began haphazardly throwing together what I imagined would be the most amazing pot-luck dish ever... 

What I used:
Potatoes: two small golden potatoes, baked and smooshed
Butter, about 3/4 of a tablespoon
Milk, just a splash
Powdered sugar, literally all the powdered sugar I had
Vanilla, just a little bit
Mix, mix, mix...
Then mix some more. This is where it started to look like it was going to maybe start thinking about thickening... I was terribly unprepared for the amount of powdered sugar this required.
I stupidly turned it out when I thought it was dough-y... It wasn't.
After that, I added flour since I was out of powdered sugar and it had turned into a  mass that I began to consider naming B.O.B.
It literally was everywhere and much like the character it sort of just refused to hold shape.
I then managed to get it into a consistency reminiscent of the play-dough my Grama used to make for me after school.. 
I rolled it out and sliced it into two manageable size slabs and spread the peanut butter over it 
Then began rolling it up
After it was rolled I wrapped it in foil and stuck it in the freezer to chill for a little bit (while I typed this up and made my sacrifice to the kitchen gods)
Once it has chilled it can be sliced, I ended up with a pretty thick roll and got fairly large, cookie size slices, in a do-over, I would roll the dough thinner and keep the roll skinnier to make smaller, more bite-size slices. This is very rich. the dough itself tastes like sugar which is unsurprising considering it basically is just that. With the peanut butter inside, it tastes very much like peanut butter fudge in a very sugary kind of way. I was pretty happy with the outcome however after my sacrifice to the kitchen gods I immediately ate an entire two baked potatoes in attempt to counteract the inevitable sugar hangover and to suppress the very real threat of my body rejecting the shear amount of pure sugar I just consumed. In the candy's defense I definitely over-did it by a LOT.. My advice to you: Do not attempt to eat a cheeseburger size portion of this all at once.  

0 Spaghetti Squash

Sunday, January 13, 2013
I have been eating a little more "healthy" lately.. for a while that meant I was eating salads and being hungry ALL the time and basically not eating GOOD food. Healthy doesn't have to mean yucky. I have been playing around with substitutions and trying to eat happy. This is what I had for lunch the other day:
Not too bad right? Basically my own variety of chicken parmigiana. It is half a chicken breast with spaghetti squash (which is 40cal/cup) spaghetti sauce and a torn up piece of mozzarella string cheese. Here is how to make spaghetti squash:
Step one: choose a spaghetti squash. These are more commonly available during the fall but once you buy it, it will keep for ever. Okay not forever but if you keep it in the fridge it will last for like 4mos, on the counter it will keep for a month and a half or so. Choose one that is pretty solid in color, they should be a sunshiney lightish yellow. You don't want it to look like it got beat up, pick one that doesn't have any bruising or blemishes. 
Set the oven to 375F and let it pre-heat
Start poking holes in your squash, this is important, if you don't poke holes it could blow up...
Once it is good and holey put it in a baking pan (I used a pie plate) to keep it from moving around and bake it for about an hour
Once it is out you will want to let it sit until it is cool enough to handle. 
You will notice that the outside is hard, kind of shell-like
Cut it in half this way (vertically) if you cut it the other way it wont work. 
This is what the inside should look like, you will want to take the seeds and vertical string gunk out
There. Now this is the part you eat..
It should scrape right out with a fork. 
You will be left with two shell type pieces that you can throw out. 
I packed the stringy bits into four mason jars to be taken to work, microwaved and topped with sauce, chicken and cheese. This stuff can be eaten plain and has a slightly sweet flavor to it but is mostly tasteless so you can top it with whatever you want and it will pretty much take on the taste of whatever you put on it. Top it with spaghetti sauce and it tastes like spaghetti. It has a slight crunch to it but is mostly noodle textured. I am usually really weird about what I will and will not eat, and this passed. I have made it before where I cut it in half and got rid of the "guts" before baking and I think either way  it worked out fine. it is harder to cut in half when it is raw but the guts come out easier so its kind of a wash as far as which way is easier/better. 

Happy Baking =]
Enjoy =]

0 Cheese Sticks

Sunday, January 6, 2013
I LOVE cheese sticks! LOVE them.. Completely, with every piece of my heart. What I don't love: frozen food. What else I don't love: paying $8 for six cheese sticks, then having to share them with everyone at the table while we wait on the main course. My solution? Make them! What I used? String cheese, bisquick, seasoning, an egg. That's it. Oh, and despite my love for pulling them apart and eating them from the middle out to the ends, I made them bite-size to avoid the awkward moment when the crusty bits fall to pieces in your hands and get all over and end up mostly in your lap. Here is how they turned out:
So here is where we start, with string cheese (these might be out of date, if so, it's only by a little bit and there is a definite chance that I am reading this wrong.. most of my food doesn't have packaging so it's a little weird)
Start by cutting the cheese into bite size pieces
Put some oil in a pan and get it heating, you will want med/hi heat (I didn't start the stove until I put in the first cheese bite but starting it and getting the heat going would've been a much better idea- learn from me)
So the way I have this set up is dunk-dunk-drop. Dip the cheese stick in the egg, then the bisquick (with seasoning) then I did it a second time before dropping into the oil. 
First the egg..
then the bisquick/seasoning
Then the oil..
They will need to be flipped/rolled over halfway through
Beautiful. 
I worked it out to where once one was ready to come out another needed to be flipped and a new one was being added all at the same time. 
OmGod.. yes. These were amazing
dunk them in some spaghetti sauce and you're set, bite size no-touch cheese sticks. Never frozen, no need to share. Deliciousness. Again, I am in love. These were amazing and made for an excellent lunch. I hope as always that this was helpful, that you try this, and that you too fall hopelessly in love. 

Enjoy
=]  

0 T-Shirt Up-cycle

Saturday, September 8, 2012
I needed a new gym shirt but I didn't want to go to the store. Honestly, I hate shopping. Don't get me wrong I like getting new clothes as much as the next girl, I just seriously detest the process of shopping, the trying things on and what-not. Nothing ever looks like you expect it to off the rack, or at least not like I expect it to. So, when I decided I needed a new gym shirt I also took note of the abundance of oversize T-shirts I keep as pajamas. This is what I ended up with:
And here is how it started (this is a large men's t-shirt):
All you need are a pair of scissors and a bobby pin, no sewing skills required. 
Start by cutting off the bottom seam
Stretch it out so the edges roll up a little
Cut off the sleeves
And the neck..
Flip it over and on the back cut it like you're making a V-neck
Cut the back like you see here... ^^^
Remember cutting the bottom seam? Cut the stitching off of it. 
Like this..
Take the piece withOUT stitching and stretch it out
Gather the back of the shirt in your hand
Separate the two straps in your fingers like this
Tuck one end of the non stitched, stretched portion of the seam under your thumb, and start wrapping from the bottom up towards your hand. 
When you get to the place where the straps separate, start wrapping in a herringbone pattern
Like this..
 
Once you have gone up as far as you'd like (a couple inches are plenty), get a bobby pin
Slip the bobby pin onto the tail end of the stringy piece (you can cut some of the excess, there will be plenty, just make sure you leave yourself 5in or so)
Stick the bobby pin under the wrapped part
Pull it through and cut off the extra, you can put it through all the way to the bottom if it makes you feel better but this is far enough, I promise. 
And there you have it, a brand new gym shirt without going to the store. I regularly wear a size small in t-shirts, this shirt was a large, I also did this to a medium shirt, that worked out a little better. If you have the option, choose a shirt one size larger than your actual shirt size. 
Again here's the back.. 

Happy Crafting =]
Enjoy =]